So you found a nifty jQuery plugin and you can’t wait to use it on your WordPress-powered site. But now you face the beginner’s challenge: how to install it without losing your sanity in the process. It’s not as difficult as it might seem if you know how to navigate the terrain. In this tutorial I’ll show you how to prepare, load, and call a jQuery plugin on a WordPress website.
The Plugin
For this example we are going to load a free responsive jQuery slider called PgwSlideshow:

Our plugin contains the following CSS and JQuery files:
- pgwslideshow.css
- pgwslideshow.min.css
- pgwslideshow_light.css
- pgwslideshow_light.min.css
- pgwslideshow.js
- pgwslideshow.min.js
The files with the “.min” extension are “minified” versions of the css and js files. A minified file is simply one that has been stripped of all extra space. They are virtually impossible to read, but they’re also smaller in size, so they load faster on your page.
A jQuery plugin typically provides both regular and minified versions of the plugin files, but you should only load the min versions on your site for performance reasons. In this tutorial we will be loading pgwslideshow.min.js and pgwslideshow.min.css.
The Prep
This tutorial makes a few important assumptions:
- You’re using a child theme. This is strongly recommended because it protects your changes from being overwritten by future theme upgrades.
- You have a functions.php file in your child theme. If you don’t, you’ll need to learn a little about this file and create one before proceeding.
- You’ve created folders in your child theme directory called js, css, and images. If you like to organize your files differently, just be sure to adjust the file paths in this tutorial accordingly.
Okay, ready to make this happen? Let’s roll.
1. Make the Code Compatible with WordPress
First we need to tweak our jQuery file so it will work in the WordPress environment. WordPress comes loaded with the latest jQuery library, which is set to ‘No Conflict’ mode to prevent clashes with other Javascript libraries you may be using. Consequently, jQuery scripts using the “$” symbol won’t work in WordPress.
To fix the problem we’ll simply replace every occurrence of “$” with “jQuery” in pgwslideshow.min.js using the find/replace function of a standard text editor. For example, this bit of code in our script:
$(this).addClass('elt_' + element.id);
will become:
jQuery(this).addClass('elt_' + element.id);
After saving the changes to pgwslideshow.min.js, we’ll place our plugin files at the following locations within WordPress:
pgwslideshow.min.js <child-theme-directory>/js/pgwslideshow.min.js.
pgwslideshow.min.css <child-theme-directory>/css/pgwslideshow.min.css.
2. Enqueue the Code in WordPress
Next we’ll add some code to functions.php that will tell WordPress to load our two plugin files. This code hooks into the ‘wp_enqueue_scripts’ action that WordPress automatically executes whenever you load a page.
Since the slideshow will be on a page entitled “My Photography,” our function only needs to load the plugin files when that page is accessed. Note that you could also use a blog post title within the is_page() check below:
function load_slideshow_scripts() {

       if(is_page('My Photography')) {
            wp_register_style( 'slideshowstyle', get_stylesheet_directory_uri() . '/css/pgwslideshow.min.css', false, 0.1 );
            wp_enqueue_style( 'slideshowstyle' );
            wp_register_script( 'theslideshow', get_stylesheet_directory_uri() . '/js/pgwslideshow.js', array('jquery'), false, true );
            wp_enqueue_script( 'theslideshow' );
        }
}
add_action( 'wp_enqueue_scripts', 'load_slideshow_scripts' );
If you should later run into problems getting the slideshow to work, the code below can be temporarily added to the function above for debugging purposes. Just place these lines right after that last wp_enqueue_script() call:
if(wp_script_is( 'theslideshow', 'enqueued' )) { echo "<BR>Slideshow script enqueued successfully!"; }
if(wp_style_is( 'slideshowstyle', 'enqueued' )) { echo "<BR>Slideshow style enqueued successfully!"; }
This will display two success messages at the very top of the slideshow page upon successfully loading the plugin files. If those messages don’t appear when you hit the page, you’ve got a script loading problem on your hands.
3. Call the Script on a WordPress Page
Lastly, it’s time to place the necessary jQuery and HTML on our slideshow page. The PgwSlideshow plugin documentation provides the following example for calling the jQuery plugin on your web page:
$(document).ready(function() {
    $('.pgwSlideshow').pgwSlideshow();
});
We’ll tweak this a bit to make it compatible with WordPress. First, navigate to the page where you want to put your slideshow, open it in edit mode, and click on the WordPress “text” editor tab. Then copy and paste the code below into the editor.
Notice that we have replaced the “$” with “jQuery” for the reasons explained in step one. A few optional parameters have also been added in the function call to configure the slideshow. These can be modified or added to as desired. And below the jQuery function call is a sample template for the unordered list of slides that the plugin will need:
<script type="text/javascript">
jQuery(document).ready(function() {
     jQuery('.pgwSlideshow').pgwSlideshow({
          transitionEffect: "fading",
          transitionDuration: 650,
          maxHeight: 700,
          displayControls: true
     });
});
</script>
<ul class="pgwSlideshow">
     <li><img src='../wp-content/themes/your-child-theme-here/images/your-image-1.jpg' alt='Somewhere, USA' data-description='Some Description'></li>
     <li><img src='../wp-content/themes/your-child-theme-here/images/your-img-2.jpg' alt='Somewhere, USA' data-description='Some Description'></li>
     <li><img src='../wp-content/themes/your-child-theme-here/images/your-image-3.jpg' alt='Somewhere, USA' data-description='Some Description'></li>
</ul>
Now we have one final issue to address. WordPress automatically adds paragraph tags to your markup, which will actually prevent the jQuery call as formatted above from working. One way to fix the issue is to place the entire script call onto one single line like this:
<script type="text/javascript">jQuery(document).ready(function() { jQuery('.pgwSlideshow').pgwSlideshow({transitionEffect: "fading", transitionDuration: 650, maxHeight: 700, displayControls: true});});</script>
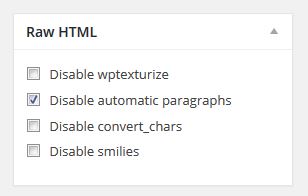
However, the line is now more difficult to read. If you prefer to keep the original formatting you can disable the auto paragraphs instead with a handy little WordPress plugin called Raw HTML. This plugin adds a widget on the WP page editor that allows us to switch off auto paragraphs for a given page as shown below:
Save your changes to the slideshow page, and that’s all there is to it. Mission accomplished!
Conclusion
As we’ve seen, loading a jQuery plugin in WordPress is relatively painless when you’re armed with the right information. And the principles discussed here apply to any jQuery plugin you may want to install on WordPress. Check out my live demo of this slideshow plugin – and enjoy a few nature photos while you’re at it – on my photography page. Please note that I have adjusted the css and used Adobe Photoshop Elements to create uniformly-sized slides for optimal viewing.
Good luck, and happy plugging!
Did you find this post helpful? Say thanks by clicking the Facebook “like” button below!
Resources
jQuery Documentation on ‘No Conflict’ Mode
WordPress Codex: Child Themes and functions.php
WordPress Codex: Enqueing Scripts
Sarah
Sarah holds a B.S. in Information Science and worked in the corporate world as a software engineer for 12 years before striking out as a freelance WordPress web developer in 2013. When she is not furiously coding away, she can be found outdoors exploring Florida's natural beauty with a camera in hand.